Note
Large portions of this document came from or are inspired by the Xarray Contributing Guide.
Overview#
xCDAT is a community-driven open source project and we welcome everyone who would like to contribute! Feel free to open a GitHub Issue for bug reports, bug fixes, documentation improvements, enhancement suggestions, and other ideas.
We encourage discussion on any xCDAT related topic in the GitHub Discussion forum. You can also subscribe to our mailing list for news and announcements related to xCDAT, such as software version releases or future roadmap plans.
Please note that xCDAT has a Code of Conduct. By participating in the xCDAT community, you agree to abide by its rules.
Where to start?#
If you are brand new to xCDAT or open-source development, we recommend going through the GitHub Issues page to find issues that interest you. If you are interested in opening a GitHub Issue, you can use these templates.
Some issues are particularly suited for new contributors by the label type: docs and good-first-issue where you could start out. These are well documented issues, that do not require a deep understanding of the internals of xCDAT. Once you’ve found an interesting issue, you can return here to get your development environment setup.
New contributions must be made under the Apache-2.0 with LLVM exception license.
Documentation updates#
Contributing to the documentation is an excellent way to help xCDAT. Anything from fixing typos to improving sentence structure or API docstrings/examples can go a long way in making xCDAT more user-friendly.
To open a documentation update request, please use the documentation update template.
Bug reports#
Bug reports are an important part of making xCDAT more stable. Having a complete bug report will allow others to reproduce the bug and provide insight into fixing.
Trying out the bug-producing code on the main branch is often a worthwhile exercise
to confirm that the bug still exists. It is also worth searching existing bug reports and
pull requests to see if the issue has already been reported and/or fixed.
To open a new bug report, please use this issue bug report template.
Enhancement requests#
Enhancements are a great way to improve xCDAT’s capabilities for the broader scientific community.
If you are proposing an enhancement:
Explain in detail how it would work
Make sure it fits in the domain of geospatial climate science
Keep the scope as narrow as possible, to make it easier to implement
Generally reusable among the community (not model or data-specific)
Remember that this is a open-source project, and that contributions are welcome :)
To open a new enhancement request, please use this issue enhancement request template.
All other inquiries#
We welcome comments, questions, or feedback! Please share your thoughts on the GitHub Discussions forum!
Version control, Git, and GitHub#
The code is hosted on GitHub. To contribute you will need to sign up for a free GitHub account. We use Git for version control to allow many people to work together on the project.
Some great resources for learning Git:
Matthew Brett’s Pydagogue
Getting started with Git#
GitHub has instructions for setting up Git including installing git, setting up your SSH key, and configuring git. All these steps need to be completed before you can work seamlessly between your local repository and GitHub.
Set up the Repo#
Note
The following instructions assume you want to learn how to interact with GitHub via the git command-line utility, but contributors who are new to git may find it easier to use other tools instead such as GitHub Desktop.
Once you have Git setup, you have two options for working with the xcdat repository:
(1) Clone the main repository, (2) Fork the main repository and clone your fork.
Clone the main repository
If you are a regular xCDAT contributor and have direct write access to the main repository, you can clone the main repository running
git clone https://github.com/xCDAT/xcdat.git.
Fork the main repository and clone your fork
If you are not a regular xCDAT contributor and don’t have write access to the main repository, you will need to fork the main repository then clone your fork.
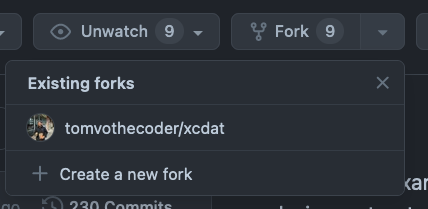
Head over to the GitHub repository page, click the fork button, and click “Create a new fork” (shown below).
Then clone your fork by running
git clone https://github.com/<GITHUB-USERNAME>/xcdat.git
Creating a development environment#
Before starting any development, you’ll need to create an isolated xCDAT development environment:
We recommend installing Anaconda or Miniforge3
Make sure your conda is up to date (
conda update conda)Make sure that you have forked and cloned the repository. If you are in the xCDAT organization, forking is not needed since you will have direct read access to the repository
cdto thexcdatsource directory
Now we are going through a two-step process. This will create the new environment, and not touch any of your existing environments, nor any existing Python installation.
Install the build dependencies and install the local build of
xcdat.>>> conda env create -f conda-env/dev.yml >>> conda activate xcdat_dev >>> >>> make install # or python -m pip install .
At this point you should be able to import
xcdatfrom your locally built version:$ python # start an interpreter >>> import xcdat >>> xcdat.__version__ '0.6.1'
To view your environments:
conda info -e
To return to your root environment:
conda deactivate
See the full conda docs here.
Install pre-commit hooks#
We highly recommend that you setup pre-commit hooks to automatically run all the tools listed in the Code formatting section every time you make a git commit.
To install the hooks
>>> python -m pip install pre-commit
>>> pre-commit install
This can be done by running:
>>> pre-commit run
from the root of the xcdat repository. You can skip the pre-commit checks with
git commit --no-verify.
Note, these hooks are also executed in the GitHub CI/CD build workflow and must pass before pull requests can be merged.
Contributing to the code base#
Pull request (PR)#
When you open a pull request on GitHub, there a template with a checklist available to use.
Here’s a simple checklist for PRs:
Properly comment and document your code. API docstrings are formatted using the NumPy style guide
Test that the documentation builds correctly by typing
make docsin the root of thexcdatdirectory. This is not strictly necessary, but this may be easier than waiting for CI to catch a mistake.Test your code.
Write new tests if needed.
Test the code using Pytest. Running all tests (type
make testorpytestin the root directory) takes a while, so feel free to only run the tests you think are needed based on your PR (example:pytest tests/test_dataset.py). CI will catch any failing tests.
Properly format your code and verify that it passes the formatting guidelines set by Ruff. You can use pre-commit to run these automatically on each commit.
Run
pre-commit run --all-filesin the root directory. This may modify some files. Confirm and commit any formatting changes.
Push your code and create a PR on GitHub.
Use a helpful title for your pull request by summarizing the main contributions rather than using the latest commit message. If the PR addresses a GitHub Issue, please reference it.
Code formatting#
xCDAT uses several tools to ensure a consistent code format throughout the project:
Ruff for standardized code formatting, linting, and ordering of imports.
MyPy for static type checking on type hints
We highly recommend that you setup pre-commit hooks to automatically run all the above tools every time you make a git commit. Check out the Install pre-commit hooks section above for instructions.
Testing with continuous integration#
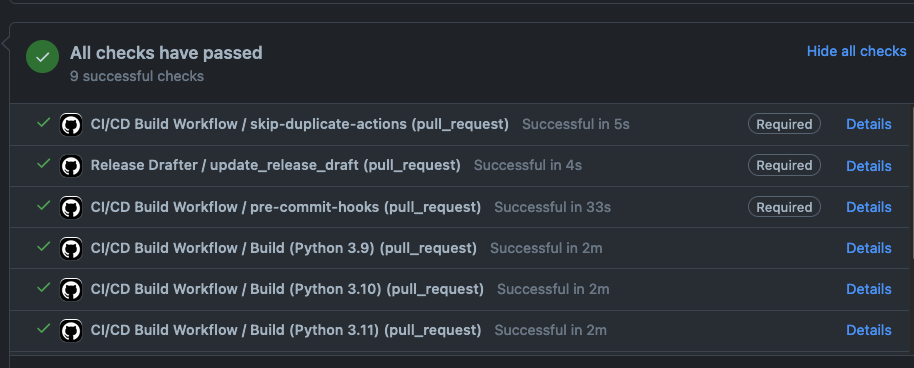
The xCDAT build workflow runs the test suite automatically via the GitHub Actions, continuous integration service, once your pull request is submitted.
A pull-request will be considered for merging when you have an all ‘green’ build. If any tests are failing, then you will get a red ‘X’, where you can click through to see the individual failed tests. This is an example of a green build.
Note
Each time you push to your PR branch, a new run of the tests will be triggered on the CI. If they haven’t already finished, tests for any older commits on the same branch will be automatically cancelled.
Writing tests#
All tests should go into the tests subdirectory of the specific package.
This folder contains many current examples of tests, and we suggest looking to these for
inspiration.
The xarray.testing module has many special assert functions that
make it easier to make statements about whether DataArray or Dataset objects are
equivalent. The easiest way to verify that your code is correct is to
explicitly construct the result you expect, then compare the actual result to
the expected correct result:
def test_constructor_from_0d():
    expected = Dataset({None: ([], 0)})[None]
    actual = DataArray(0)
    assert_identical(expected, actual)
Developer tips#
Helpful commands#
Note
Run
make helpin the root of the project for a list of useful commandsRun
make installto install a local build of xCDAT into your conda environmentRun
make cleanto delete all build, test, coverage and Python artifacts
xCDAT and Visual Studio Code#
We recommend using VS Code as your code editor because it is open-source and has great Python development support.
xCDAT includes a VS Code Workspace file, which conveniently configures VS Code for quality assurance tools, code line-length rulers, and more. You just need to open this file using VS Code, create your development environment, and select the appropriate Python interpreter for the workspace (from the dev environment).
Some recommended extensions include: